Практическое руководство. Закрашивание области с помощью Drawing
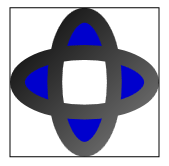
Этот пример показывает, как можно закрасить область рисунком. Чтобы закрасить область рисунком, используйте DrawingBrush и одного или нескольких Drawing объектов. В следующем примере используется DrawingBrush для закраски объекта рисунком из двух эллипсов.
Пример
<!-- Demonstrates the use of DrawingBrush. -->
<Page
  xmlns="http://schemas.microsoft.com/winfx/2006/xaml/presentation"
  xmlns:x="http://schemas.microsoft.com/winfx/2006/xaml"
  Background="White">
  <StackPanel Margin="20">

    <Rectangle Width="150" Height="150" Stroke="Black" StrokeThickness="1">
      <Rectangle.Fill>
        <DrawingBrush>
          <DrawingBrush.Drawing>
            <GeometryDrawing Brush="MediumBlue">
              <GeometryDrawing.Geometry>
                <GeometryGroup>
                  <EllipseGeometry RadiusX="20" RadiusY="45" Center="50,50" />
                  <EllipseGeometry RadiusX="45" RadiusY="20" Center="50,50" />
                </GeometryGroup>
              </GeometryDrawing.Geometry>
              <GeometryDrawing.Pen>
                <Pen Thickness="10">
                  <Pen.Brush>
                    <LinearGradientBrush>
                      <GradientStop Offset="0.0" Color="Black" />
                      <GradientStop Offset="1.0" Color="Gray" />
                    </LinearGradientBrush>
                  </Pen.Brush>
                </Pen>
              </GeometryDrawing.Pen>
            </GeometryDrawing>
          </DrawingBrush.Drawing>
        </DrawingBrush>
      </Rectangle.Fill>
    </Rectangle>
  </StackPanel>
</Page>
using System;
using System.Windows;
using System.Windows.Controls;
using System.Windows.Media;
using System.Windows.Media.Animation;
using System.Windows.Media.Imaging;
using System.Windows.Shapes;

namespace Microsoft.Samples.DrawingBrushExamples
{
    /// <summary>
    /// Paints a Rectangle element with a DrawingBrush.
    /// </summary>
    public class DrawingBrushExample : Page
    {
        public DrawingBrushExample()
        {
            Background = Brushes.White;
            StackPanel mainPanel = new StackPanel();

            // Create a drawing of two ellipses.
            GeometryDrawing aDrawing = new GeometryDrawing();

            // Use geometries to describe two overlapping ellipses.
            EllipseGeometry ellipse1 = new EllipseGeometry();
            ellipse1.RadiusX = 20;
            ellipse1.RadiusY = 45;
            ellipse1.Center = new Point(50, 50);
            EllipseGeometry ellipse2 = new EllipseGeometry();
            ellipse2.RadiusX = 45;
            ellipse2.RadiusY = 20;
            ellipse2.Center = new Point(50, 50);
            GeometryGroup ellipses = new GeometryGroup();
            ellipses.Children.Add(ellipse1);
            ellipses.Children.Add(ellipse2);

            // Add the geometry to the drawing.
            aDrawing.Geometry = ellipses;

            // Specify the drawing's fill.
            aDrawing.Brush = Brushes.Blue;

            // Specify the drawing's stroke.
            Pen stroke = new Pen();
            stroke.Thickness = 10.0;
            stroke.Brush = new LinearGradientBrush(
                Colors.Black, Colors.Gray, new Point(0, 0), new Point(1, 1));
            aDrawing.Pen = stroke;

            // Create a DrawingBrush
            DrawingBrush myDrawingBrush = new DrawingBrush();
            myDrawingBrush.Drawing = aDrawing;

            // Create a Rectangle element.
            Rectangle aRectangle = new Rectangle();
            aRectangle.Width = 150;
            aRectangle.Height = 150;
            aRectangle.Stroke = Brushes.Black;
            aRectangle.StrokeThickness = 1.0;

            // Use the DrawingBrush to paint the rectangle's
            // background.
            aRectangle.Fill = myDrawingBrush;

            mainPanel.Children.Add(aRectangle);

            this.Content = mainPanel;
        }
    }
}
На следующем рисунке показан результат выполнения этого примера.

(Центр фигуры белого, по причинам, описанным в управление заливкой составных фигур.)
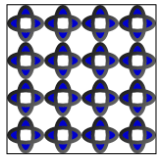
Установив DrawingBrush объекта Viewport и TileMode свойства, можно создать повторяющийся шаблон. Следующий пример выполняет заливку объекта шаблоном, созданным рисунком из двух эллипсов.
<!-- Demonstrates the use of DrawingBrush. -->
<Page
  xmlns="http://schemas.microsoft.com/winfx/2006/xaml/presentation"
  xmlns:x="http://schemas.microsoft.com/winfx/2006/xaml"
  Background="White">
  <StackPanel Margin="20">

    <Rectangle Width="150" Height="150" Stroke="Black" StrokeThickness="1">
      <Rectangle.Fill>
        <DrawingBrush Viewport="0,0,0.25,0.25" TileMode="Tile">
          <DrawingBrush.Drawing>
            <GeometryDrawing Brush="MediumBlue">
              <GeometryDrawing.Geometry>
                <GeometryGroup>
                  <EllipseGeometry RadiusX="20" RadiusY="45" Center="50,50" />
                  <EllipseGeometry RadiusX="45" RadiusY="20" Center="50,50" />
                </GeometryGroup>
              </GeometryDrawing.Geometry>
              <GeometryDrawing.Pen>
                <Pen Thickness="10">
                  <Pen.Brush>
                    <LinearGradientBrush>
                      <GradientStop Offset="0.0" Color="Black" />
                      <GradientStop Offset="1.0" Color="Gray" />
                    </LinearGradientBrush>
                  </Pen.Brush>
                </Pen>
              </GeometryDrawing.Pen>
            </GeometryDrawing>
          </DrawingBrush.Drawing>
        </DrawingBrush>
      </Rectangle.Fill>
    </Rectangle>
  </StackPanel>
</Page>
using System;
using System.Windows;
using System.Windows.Controls;
using System.Windows.Media;
using System.Windows.Media.Animation;
using System.Windows.Media.Imaging;
using System.Windows.Shapes;

namespace Microsoft.Samples.DrawingBrushExamples
{

    /// <summary>
    /// Paints a Rectangle element with a tiled DrawingBrush.
    /// </summary>
    public class TiledDrawingBrushExample : Page
    {

        public TiledDrawingBrushExample()
        {
            Background = Brushes.White;
            StackPanel mainPanel = new StackPanel();

            // Create a drawing of two ellipses.
            GeometryDrawing aDrawing = new GeometryDrawing();

            // Use geometries to describe two overlapping ellipses.
            EllipseGeometry ellipse1 = new EllipseGeometry();
            ellipse1.RadiusX = 20;
            ellipse1.RadiusY = 45;
            ellipse1.Center = new Point(50, 50);
            EllipseGeometry ellipse2 = new EllipseGeometry();
            ellipse2.RadiusX = 45;
            ellipse2.RadiusY = 20;
            ellipse2.Center = new Point(50, 50);
            GeometryGroup ellipses = new GeometryGroup();
            ellipses.Children.Add(ellipse1);
            ellipses.Children.Add(ellipse2);

            // Add the geometry to the drawing.
            aDrawing.Geometry = ellipses;

            // Specify the drawing's fill.
            aDrawing.Brush = Brushes.Blue;

            // Specify the drawing's stroke.
            Pen stroke = new Pen();
            stroke.Thickness = 10.0;
            stroke.Brush = new LinearGradientBrush(
                Colors.Black, Colors.Gray, new Point(0, 0), new Point(1, 1));
            aDrawing.Pen = stroke;

            // Create a DrawingBrush
            DrawingBrush myDrawingBrush = new DrawingBrush();
            myDrawingBrush.Drawing = aDrawing;

            // Set the DrawingBrush's Viewport and TileMode
            // properties so that it generates a pattern.
            myDrawingBrush.Viewport = new Rect(0, 0, 0.25, 0.25);
            myDrawingBrush.TileMode = TileMode.Tile;

            // Create a Rectangle element.
            Rectangle aRectangle = new Rectangle();
            aRectangle.Width = 150;
            aRectangle.Height = 150;
            aRectangle.Stroke = Brushes.Black;
            aRectangle.StrokeThickness = 1.0;

            // Use the DrawingBrush to paint the rectangle's
            // background.
            aRectangle.Fill = myDrawingBrush;

            mainPanel.Children.Add(aRectangle);

            this.Content = mainPanel;
        }
    }
}
На следующем рисунке показан мозаичный DrawingBrush выходных данных.

Дополнительные сведения о кистях для рисования см. в разделе Рисование с помощью изображений, рисунков и визуальных элементов. Дополнительные сведения о Drawing объектов, см. в разделе Обзор объектов Drawing.